I have been using the pedals for a while now. Here are some general observations on the project:
Cost:
Making your own pedals is not a budget option – not by a long chalk. But, having said that, I do believe they offer much better value for money then options such as the vastly overpriced (imho) Thrustmaster T500 wheel.
I haven't 'costed-up' exactly but here are some approximate figures for the components:
Metal £60
Load-cell £28
Springs £50 (inc. two spares)
Fixtures & fittings £30+
Electronic components £30+
Other bits and bobs for the wheel and stand include:
Logitech DFGT £82
Wood £21
Screws/fittings £10+
This does not include the cost of any tools which are needed to make the thing.
Time:
Making the pedals took me about a month and a half working most nights. Like any project the first set always takes the longest to make and a lot of the time is spent working out how things should fit together. If I had to make another identical set I could probably knock them up in just a couple of weeks. I spent a lot of additional time researching the amplifier circuit, hall-effect sensors and potentiometers.
Sourcing the components;
About 90% of the parts/materials used for the pedals were sourced online. This was not out of choice as a lot of the components are sadly missing from so called diy shops. Everything was brought online with the exception of the M8 threaded rod, M8 & M6 washers and bolts along with a few electronics parts from Maplin. The hardest parts to source were the springs as I found a lot of searching for springs brought up engineering firms who aren't really set up to retail single items. The metal I brought from several retailers on ebay who offer a cutting service as well – it was very useful being able to get it supplied cut to length.
The wood for the wheel stand I did buy from a local timber merchant/hardware shop who also cut to length – this saved a huge amount of time when it came to making the stand.
Social Impact:
The project was not well appreciated by non-turismoers. If you have a girlfriend, or worse - a wife, then my advice would be to dump/divorce them before starting such a project: they will not understand or appreciate what you are trying to do and will go about doing that womens' thing of belittling your hobbies whilst claiming everything they do is incredibly important.
The wheel stand does take up a fair amount of space as it currently is. I think there are improvements/adaptations that could be made to make it more portable and storable without hampering its functionality. I haven't planned on making any such changes yet as I am still very much playing the game.
Note: It is amazing how far bits of aluminium swarf can get about.
Functionality:
I am very pleased with the functionality of my pedals and wheel stand (and the DFGT wheel for that matter). I have only had one instance of trouble when a tiny fraction of the brake stuck on during game play – this happened on a night were I was testing which spring to use in the brake and so therefore put it down to the newly fitted parts gelling together. After a month of so of gaming this has not re-occurred and neither pedal has missed a beat. The pedals are adjustable in many ways although quick adjustments are not really possible as they usually involve operations using at least several spanners.
The response of the hall-effect sensor is good although very slightly not quite linear at the top end of throttle response. The accelerator pedal response feels quite 'natural' to me (how linear is a real car's pedal?). I can usually hold the revs right were I want for standing starts (better than I can in my real car anyway), the signal is not 'jumpy' or 'spiky' in this game.
The brake is firm enough without being OTT. With it being a load-cell brake, the pedal can be set up in a number of different ways – if I set it so that there is barely any compression of the spring, the pedal has hardly any movement and is much more 'pressure sensitive'. The way I have it set up is so that there is just enough movement to get to full braking force before hitting the stop, this feels more natural to me – the pedal is still pressure sensitive of course, its just that the force is transmitted via the spring and there is more movement in the pedal.
 |
| A "quick" adjustment - this time altering the rest position of the accelerator pedal. Bolts are added to the holes in the front support to give the pedal more angle. |
So far I have managed to achieve the following feats in GT5 using my custom pedals:
Lots of race wins (a few in A-spec too).
Gold on all 60 licence tests
Gold on the tricky Lotus Elise Top Gear Test Track Challenge
Gold on all the AMG/Mercedes-Benz nurburgring challenge thing
Gold on the Sebastian Loeb Rally Challenge
Durability:
It is early days yet of course, but I do not anticipate many durability problems with these pedals – much less than I might with any brought set anyway. I think the accelerator pedal will keep going forever. I am a little concerned that using an aluminium 'L' bracket with the load-cell could lead to a premature failure compared to using a steel one, but will see how it goes. One of the advantages of having built it all myself is that I know how everything works, how it all fits together which means I will know how to fix it if anything does go wrong.
Aesthetics
As you will see from the photos, I have painted the whole stand black. I used ordinary acrylic paint for this as it is quick, cheap and safe. Had the whole stand painted and put back together within a day. I am going to continue using it with the office chair: a proper car seat wouldn't add much to the functionality of the set up and would take up more space.
I added a foot-rest. This is made from a single piece of wood and a right angle bracket from a hardware store held together by screws. I bent the bracket to a slightly wider angle to get the foot-rest in position. It is not the sturdiest thing but it does the job.
I also added a small car mat. This is held in position by screws.
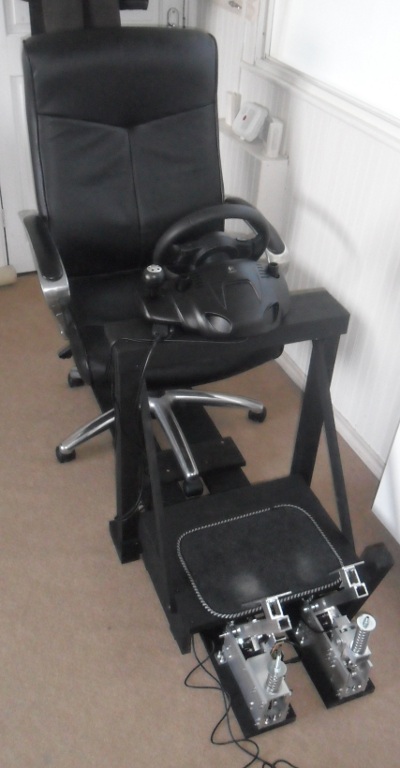 |
| The finished set-up |
 |
| Side view sans seat |
 |
| Side view |