So, one of the problems with my custom pedals is that they can't be used standalone. They need mounting to something. I sketch up a cockpit design to mount the pedals. Originally I wanted to have a cockpit that could be closed up to make it look like an ordinary table or cabinet. This is a bit ambitious for now, as I am more interested in getting the pedals working and to get in a bit of time playing the actual game.
I try to think of a really simple design. The concept I come up with, I call the 'Ski' design. Basically, each pedal is mounted at the end of a long 'ski' length plank of wood. Since there are only two pedals, this somewhat resembles a pair of skis. The other bits - footrests, wheel stand, seat - can then be built 'modularly' and fixed onto the skis. This uses the pedals in floor mount configuration. I sketch up a design and try to get the three most important bits (my ass, wheel and pedals) approximately the same distances apart as they are in my real car.
Another problem with my custom pedals is that in floor mount configuration the actual pedal is too high off the floor to be used as is. So a need a box to raise my feet higher (about 16 cm) off the ground.
 |
| "Some of these please" |
With the ski design though, I am hoping it may be possible in the future to cut the skis and fix a hinge along that point, making them more easily foldable and easier to put into storage.
I don't know much about timber and don't really have time to do a lot of research into what types of wood etc. I browse the b&q website to get an idea of what sort of stuff is available. I discover that the wood I want is referred to as 'Plain Square Edged' (PSE) Timber. To keep the design simple I will use just three types of PSE in my design. These are (side x side in mm):
44 x 44
20 x 120
12 x 32
I sketch up on a piece of paper each piece and the lengths and number of pieces I need. I take this with me to the timber shop.
I go to a local timber merchant/hardware shop and get the wood. They also have a cutting service so take advantage of this and get all the pieces cut to size. This will save me a lot of time and effort. I'm afraid I don't know to this day what kind of wood it is (as in what tree it came from). Probably pine stuff builders use as its fairly cheap. Anyway it is good for what I want.
 |
| World's Neatest Bonfire |
Making the Stand
Thanks to the having the pieces already cut to size, the wheel stand is starting to go together relatively easily. Using the skis as something to clamp to (my workbench isn't long enough) I drill holes for the main legs to fit onto the top shelf and bottom piece. Right now I don't have any decent wood screws, but these smaller ones about 45 mm in length will hold until the weekend when I can get some. Once I have them I'll just replace the current screws one at a time.
I attach the shelf pieces to the vertical legs (two 44x44 pieces of length 600). With one screw in at each end, the shelf still has a little bit of wobble in it. Adding an additional two screws at each end firms things up nicely without even having fixed the horizontal shelf support yet. The shelf is designed to be the same either way up (although later I fit some support feet to the bottom shelf). The shelf itself is made from a 21 x 210 piece of wood that is 550 in length (this is the width of the shelf). Whilst the wheel unit has a small amount of overhang at the rear I do not anticipate this being a problem. The piece I am calling the 'horizontal shelf support' is a piece of 12 x 32 of length 550 also. This fits to the underside of the shelf piece flush to the back edge. The main vertical legs are then screwed to this support piece.
The foot rest is 350mm long. The sides and top surface are all made from pieces of 21mm thick by 210 mm wide wood. Three lengths of 450mm go across the top, with two 350mm pieces as the sides. I wanted to clamp the pieces in position then drill and screw in the usual way. Unfortunately even my big G clamps aren't big enough to do this. The alternative method I used was to measure out and drill the holes on the top pieces only, add a screw through the hole so the tip was just poking out the other side. I then place the piece in the exact position on the side pieces and press down. I find I can easily screw into the side pieces without drilling, thanks to the wood being relatively soft.
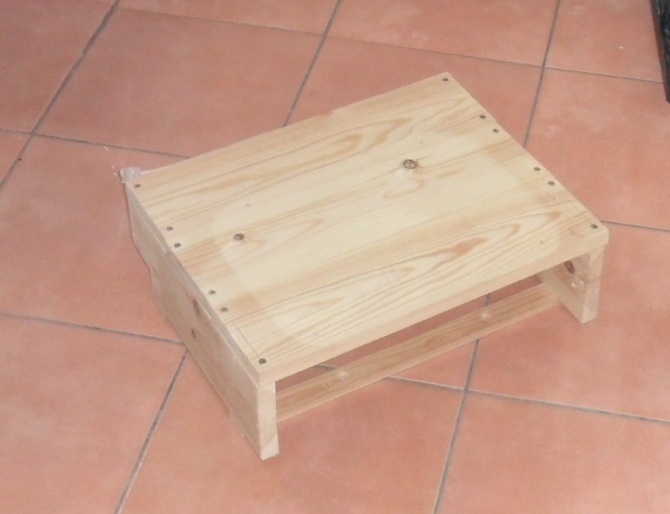 |
| The Footrest |
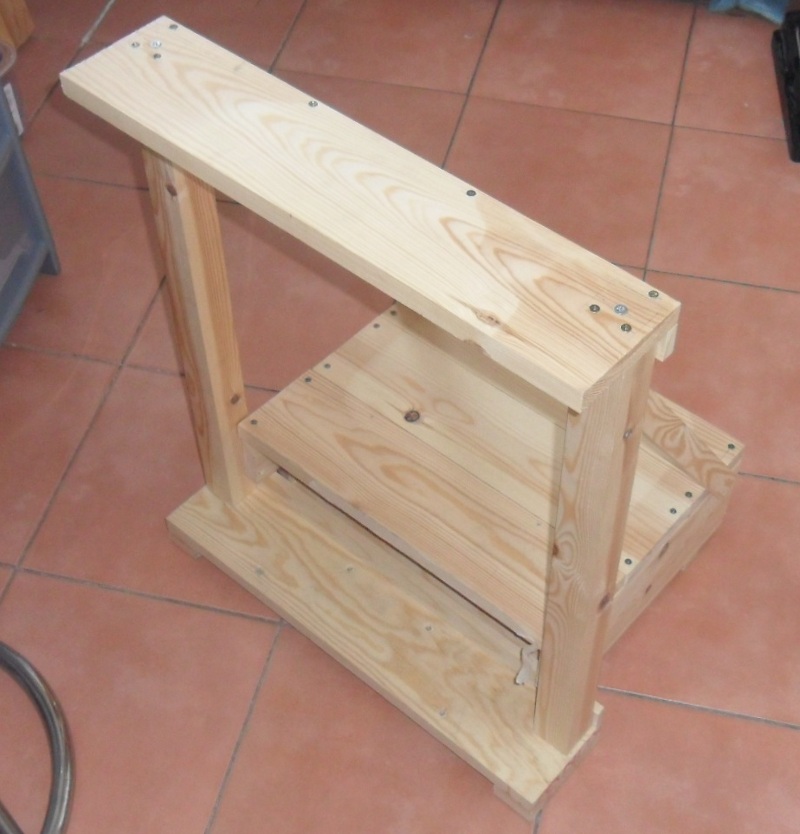 |
| The footrest and wheel shelf |
 |
| Footrest slotted into bottom of wheel shelf |
Once this is all screwed together, everything feels really solid and this unit is ready to be attached to the skis.
Ski Bindings
Ok so to fix the pedals to the planks of wood, I am using M5 bolts. I have brought some countersunk ones, 40mm long. These pass up through the bottom of the wood, through the pedal fixing brackets and are secured by a nut. The 'countersunkedness' means they will fit flush to the bottom of the wood.
I use 6 bolts for each pedal unit. There will be two brackets at the front of the pedal - one on each side. These will stop the pedal unit tipping back when the pedal is pressed. I also secure the pedal unit at the back, but this time instead of fixing brackets to the sides, I have drilled two holes in the rear support piece. There is just room for these fixings behind the pulley.
 |
| Test Fitting the stand and pedal "skis" |
Yes, but where are you going to sit.
My original intention was to buy either a proper bucket seat (one that could double for track day use in my real car) or get an old car seat and use this. But wanting to test the wheel stand first, I came up with an interim solution. I positioned the skis apart such that my “mastermind” style office chair could be wheeled up in between the skis (the chair has five wheels/castors in the usual pentagon formation – to fit, the first wheel goes in between the skis, the others are on the outside of the skis with the rear two just squeezing between the outside edges of the skis). If/when I do get a more racy seat, I can build some kind of stand and just bolt this onto the skis.
To fit myself in to use the stand, I have to drop the seat to the lowest setting. I have based my measurements of how the wheel stand should go together on measurements I made of my real car. I am used to driving in a position such that my thighs are angled slightly up from horizontal with the bottom rim of the steering wheel coming just below the height of the knees. I tried to replicate this with my wheel stand but it is not quite possible to do due to: (a) the dfgt wheel being smaller and (b) it being mounted quite high up on the wheel unit. The compromise means that my knees are quite close to being in contact with the underside of the shelf the wheel sits on.
 |
| Dimensions taken from my real car. Some of them may be approximate as they were pretty difficult to measure. The front lip of the seat is actually in front of the steering wheel. I hadn't noticed this before despite using the car nearly every day for the past 3 years. |
Testing the wheel stand.
With the pedals now properly secured for the first time ever, I get an opportunity to see how they feel when operated by my feet (you know, like how people usually drive). First thing that strikes me is the way the brake feels softer than I imagined. I had put the 2nd firmest spring on the brake rather than the 40N/mm jobby as this had felt way too tough when pressing the pedal with hands. Now the current spring feels a bit too soft. Hey, maybe my calculations were right.
The second thing is the way the accelerator feels: with the greater range of movement, my foot tends to 'slide down' the surface of the pedal as I press it. Not sure if it needs adjustment or some kind of grip added to the pedal face. As it is, currently smooth aluminium there is little to no friction between foot and pedal. Other than that, the motion feels nice and smooth with just the right level of resistance.
Anyway, having the wheel stand will enable me to test how everything 'feels' and make adjustments if necessary.
Using the wheel, I find the stand is nice and solid with no wobbly bits. The position of the wheel feels good. I think the pedals need a little adjustment as I suspect they are a little too 'upright' and need a bit more angle to lean them back. This is purely a comfort issue though.
 | |
| The wheel stand with diagonal supports and a car mat. |
The next stage of the project will be tweaking of the pedal positions/range etc and I also have plans to paint the wheel stand a fetching shade of black.
No comments:
Post a Comment